01 Why bring 3DGS into UE5 at all
At Locahun 3D I produce and sell 3DGS scan data, mostly of urban locations. A splat viewer is fine for scouting, but if you want to use a scan seriously as production material, importing it into UE5 unlocks a whole extra tier of freedom. Concretely, you get to:
- Put the camera where you physically can't stand — directly above a building, over the road, right on top of the station. Angles that would never get a filming permit are free inside the scan.
- Export high-resolution stills and video — once you lock a framing in the viewport, you can output it directly as an asset.
- Prep for VFX work — compositing with mesh assets, lighting adjustments, and producing base plates for AI relighting all happen inside one scene.
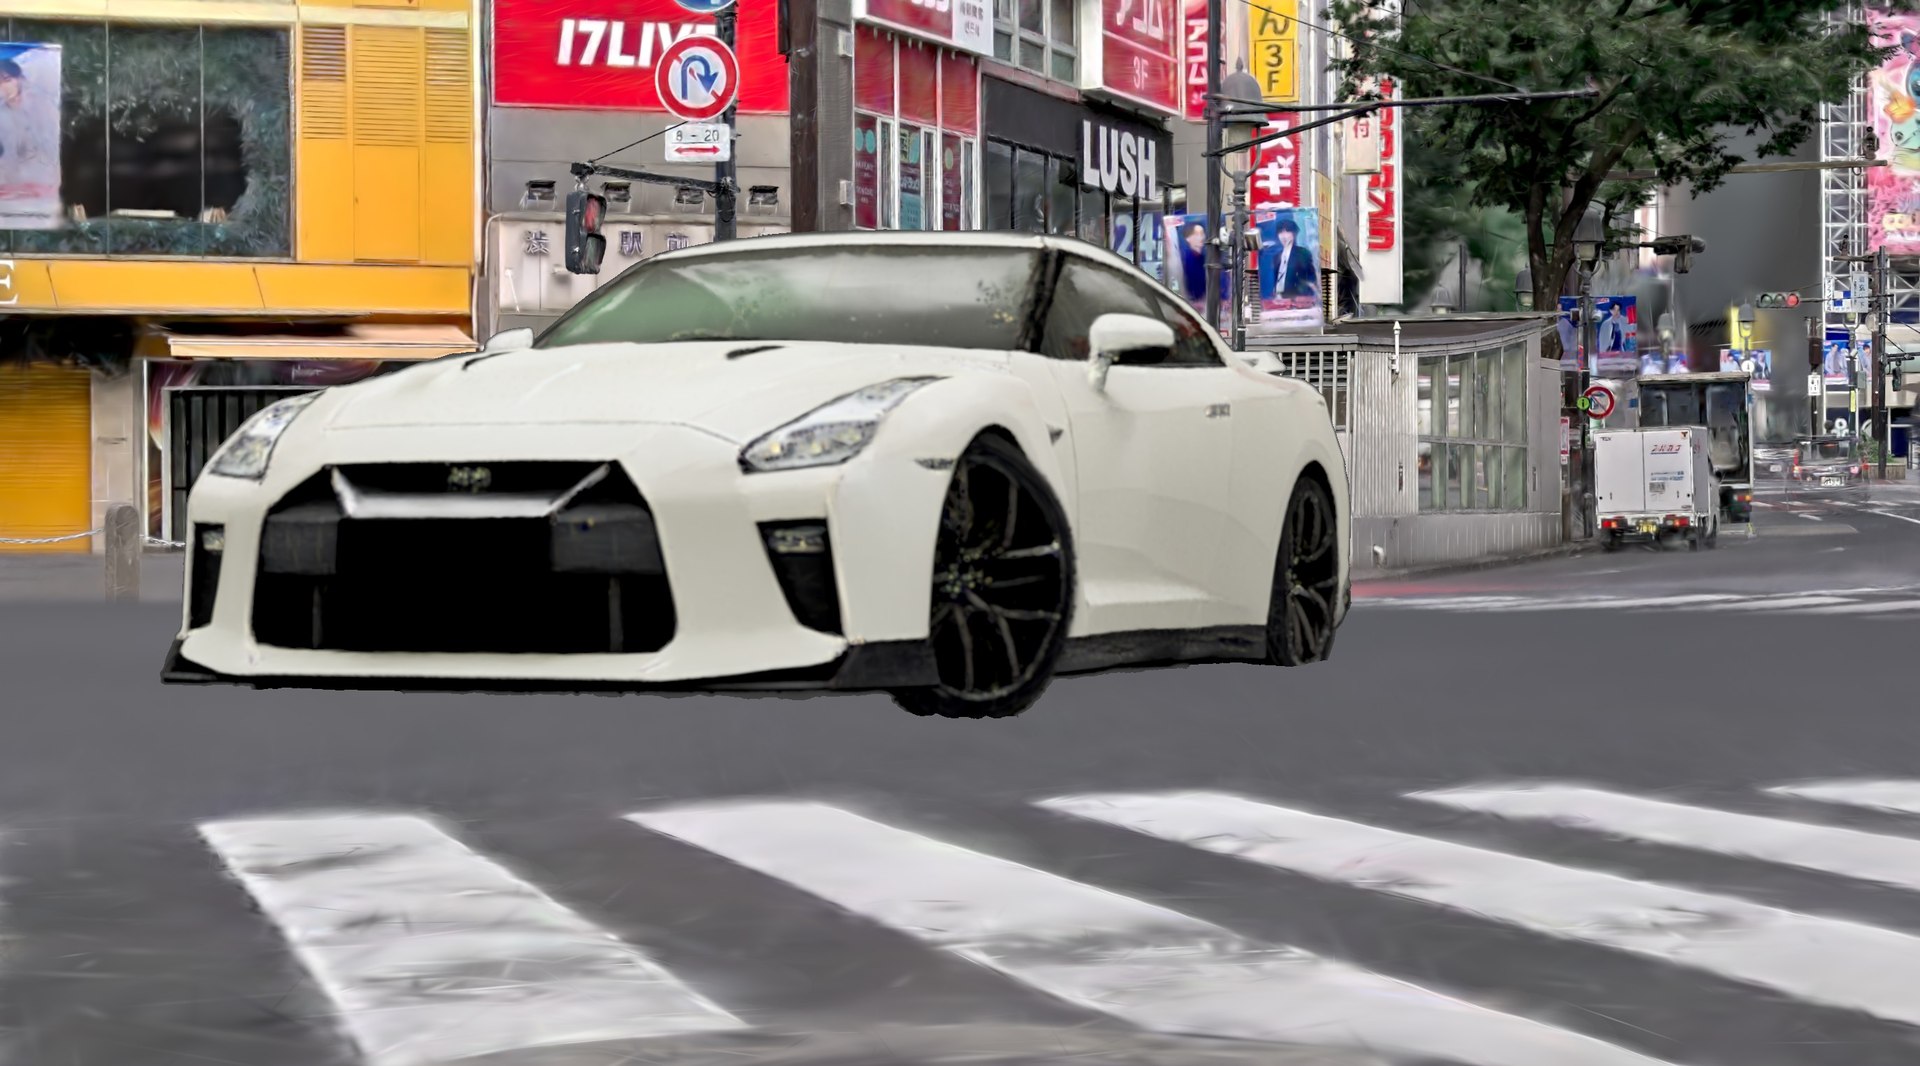
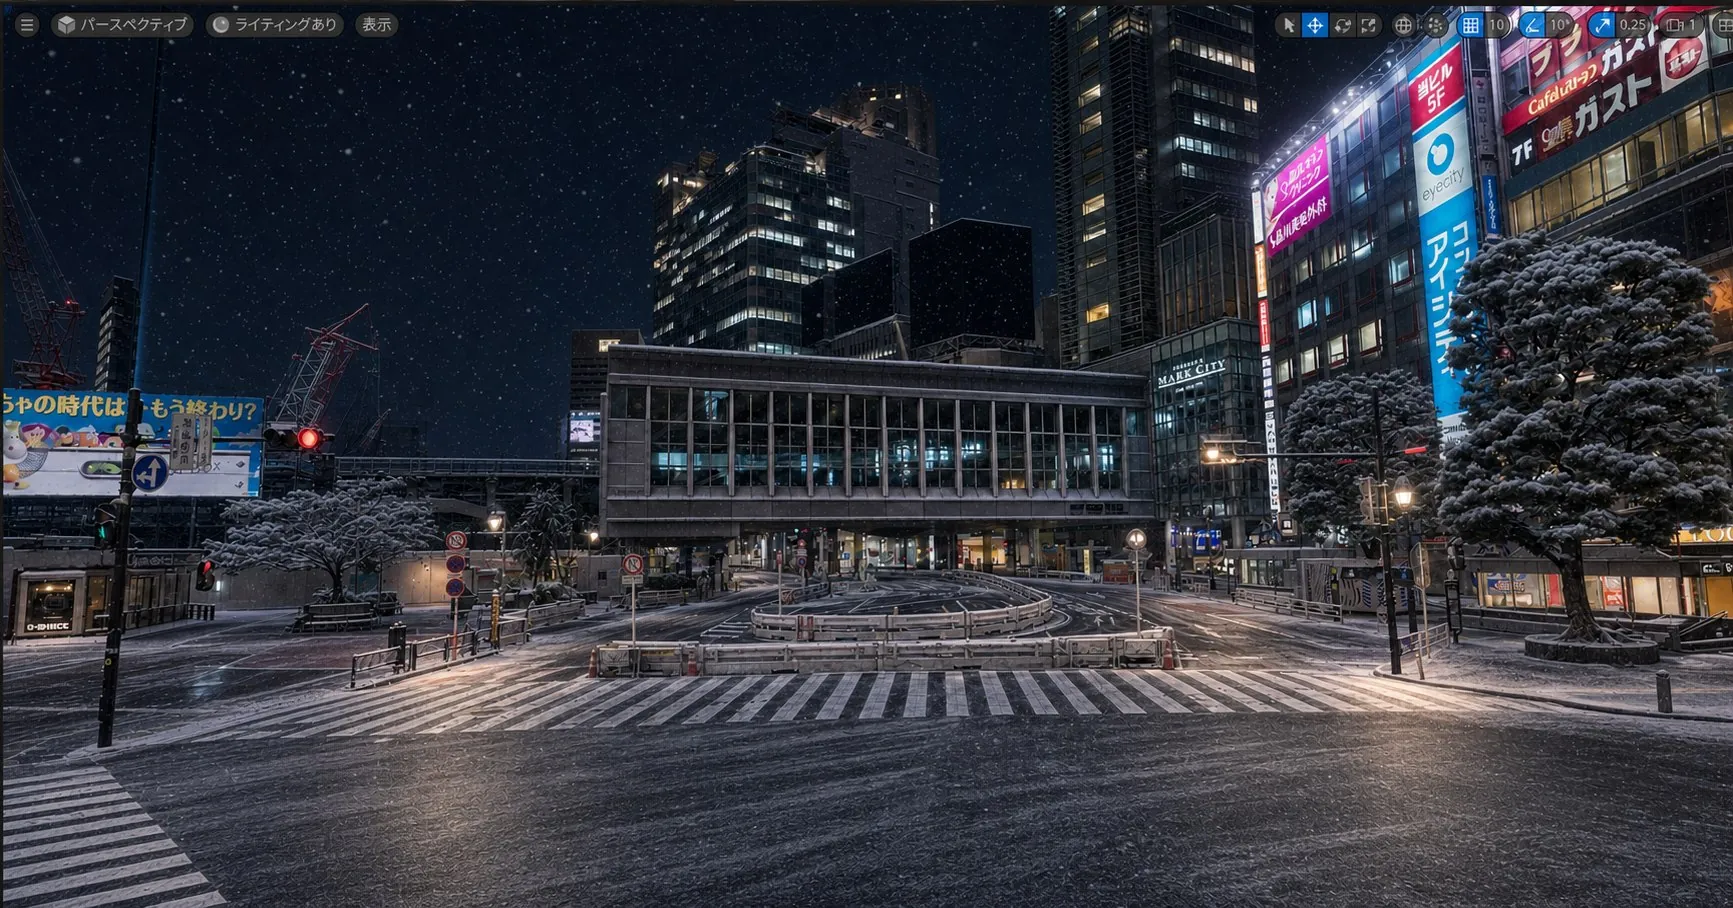
Image by senior VFX artist hectorVFX, using Locahun 3D's Shibuya data.
The downstream step — finishing the exported frames into aerial plates — will get its own article, so this one stays focused on the UE5 integration and asset export. The plugin I use is XGRIDs' LCC Plugin for UE (free).
02 What is XGRIDs' "LCC Plugin for UE" (and where to get it)
LCC Plugin for UE is the official UE5 3DGS plugin distributed by XGRIDs. It handles loading, rendering, editing, and relighting of 3DGS scenes in a single plugin. I use it for two main reasons: it scales to city-sized scans and it supports LCC2, a heavily compressed format. For a large scene like Shibuya, the files are dramatically lighter than passing PLY around, and loading stays stable.
- Engine support
- Unreal Engine 5.1–5.8 (Windows / Linux)
- Formats
- XGRIDs' own LCC2, plus standard 3DGS files from Postshot, Luma, Polycam, and similar tools, which load directly
- Scale
- No point-count limit. Playback stays smooth even in huge scenes
- Pricing
- Free and Pro tiers. Pro is currently free for a limited time (adds relighting, self-shadowing, and more)
- Usage
- Blueprint-based, no code required
LCC Plugin for UE (plugin + sample data)
The plugin ships as a per-UE-version zip from XGRIDs' developer portal. Sample data is on the same page.
https://developer.xgrids.com/#/download?page=LCC_UNREAL_SDK_UE54
Open the download page →03 Installation
Installation follows the standard UE5 plugin flow. I run the UE5.5 build of the plugin in a UE5.5 project.
- From the download page above, grab the zip that matches your exact UE version. A version mismatch is the classic cause of load errors, so this is the one step to get exactly right.
- Extract the zip and place it in the
Pluginsfolder at your project root (create the folder if it doesn't exist). If you want it available to every project, you can put it in the engine-sideEngine/Pluginsinstead. - Launch the project, open Edit → Plugins, search for "LCC", and enable it. The editor asks for a restart — go ahead and restart.
- After the restart, use the plugin's file dialog to load a .lcc / .lcc2 / .ply file, and the 3DGS scene is placed into your level.
04 Load the 3DGS and export assets with a virtual camera
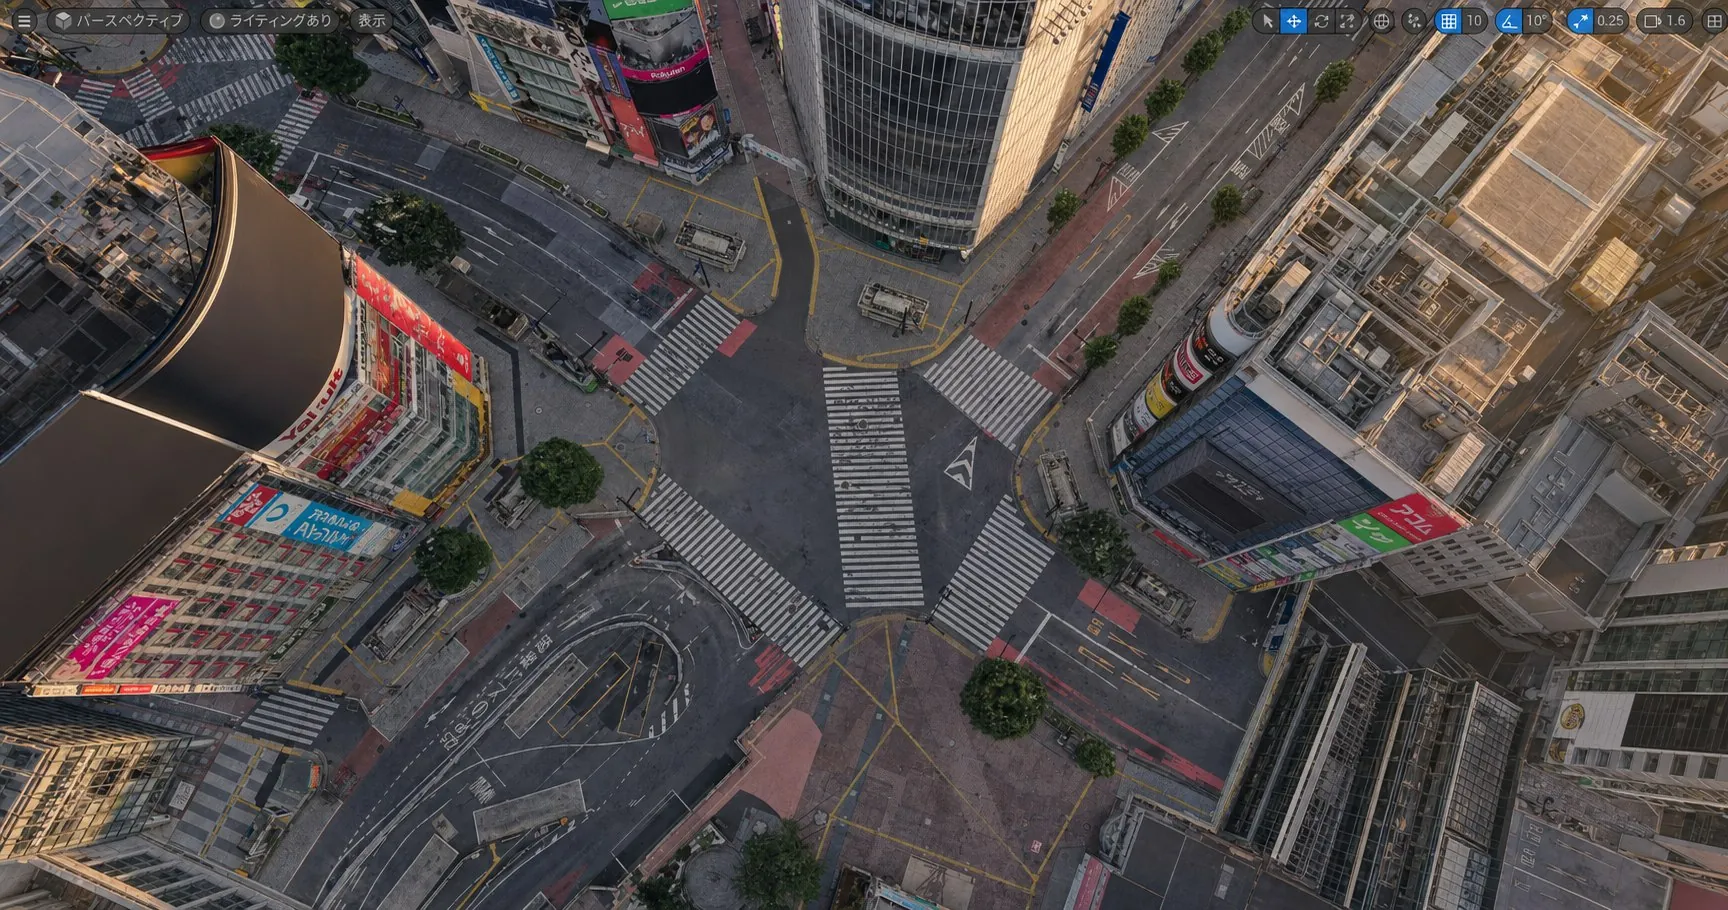
Once the scan is loaded, everything else is standard UE5. Move the camera in the perspective view and build the framing you want. For the Shibuya scramble crossing, a straight-down view from above the station can't be shot in reality — it's a drone no-fly zone — but inside the scan there are no restrictions. The core of this workflow is using a real ground-level scan as the foundation, then freeing only the camera from physics.
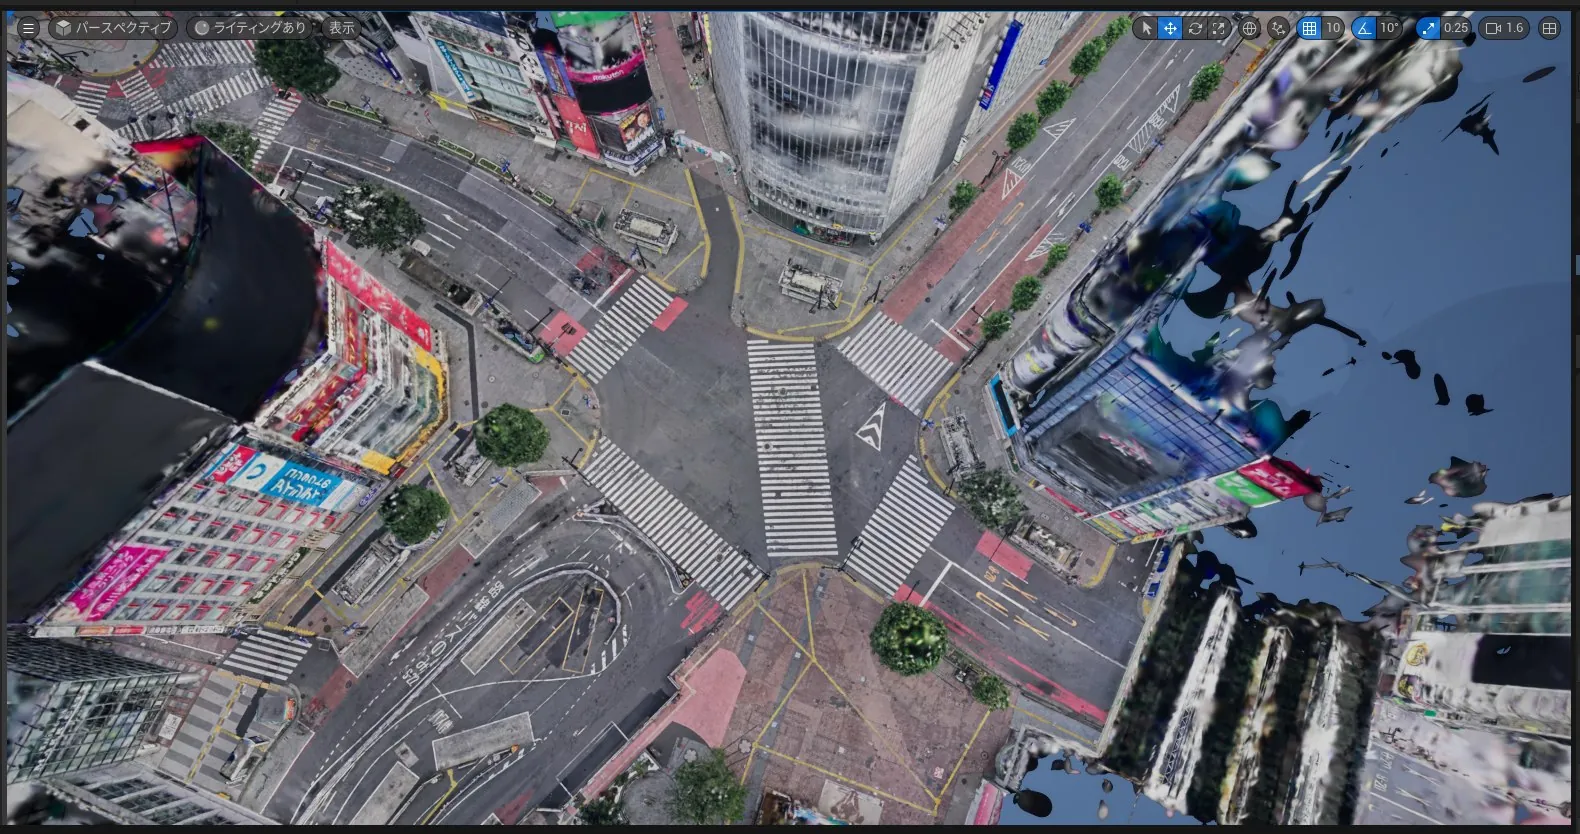
With the framing locked, export it as an asset. For stills, running a High Resolution Screenshot (HighResShot) at a specified resolution gives you a frame ready for compositing and retouching. For video, building a camera animation in Sequencer lets you render the shot with full camera movement.
05 Changing lighting and season with AI
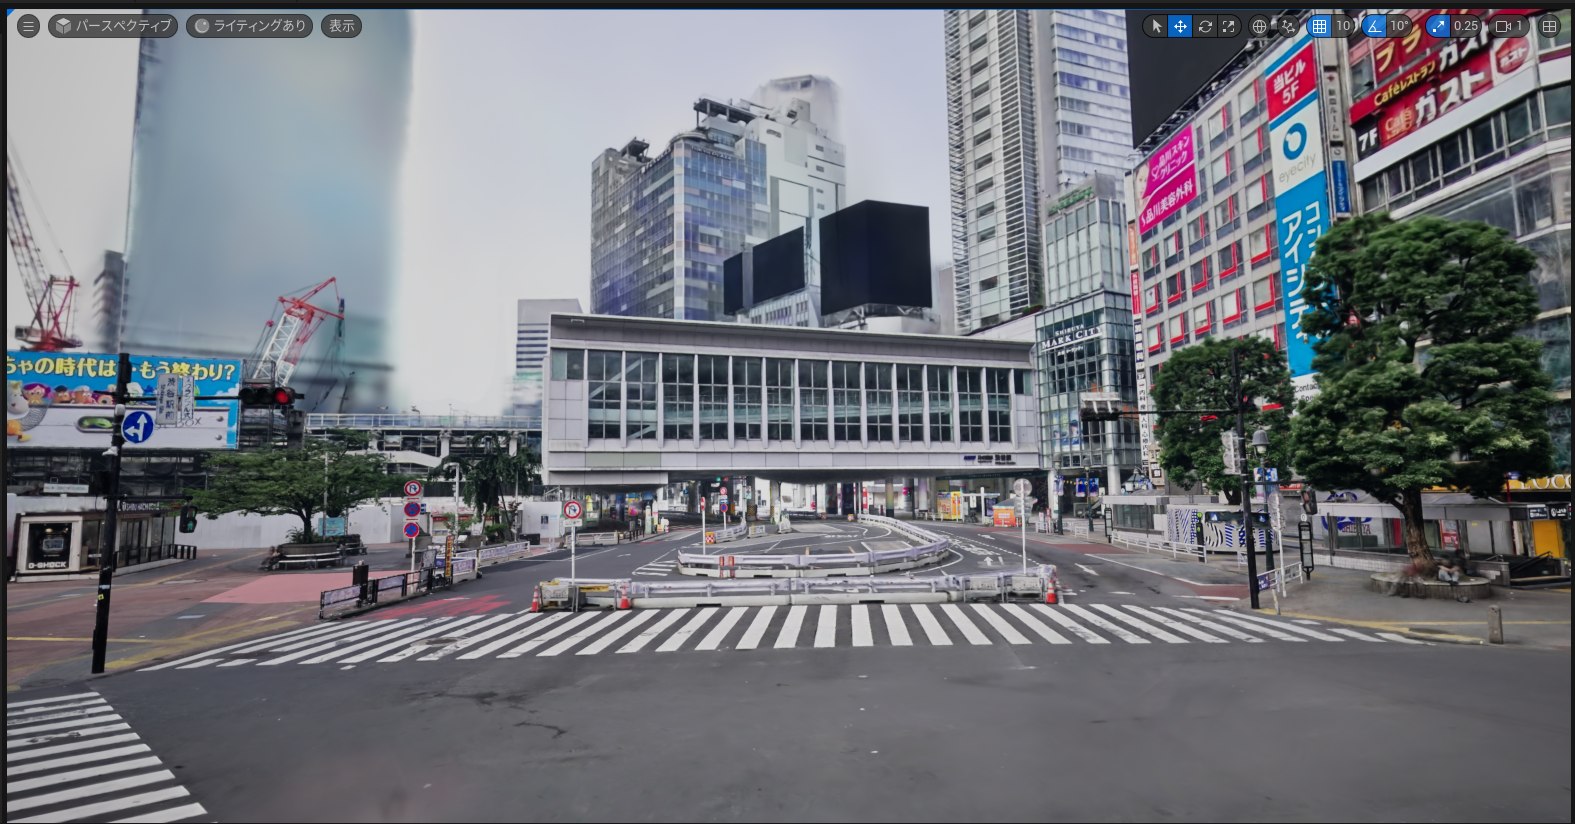
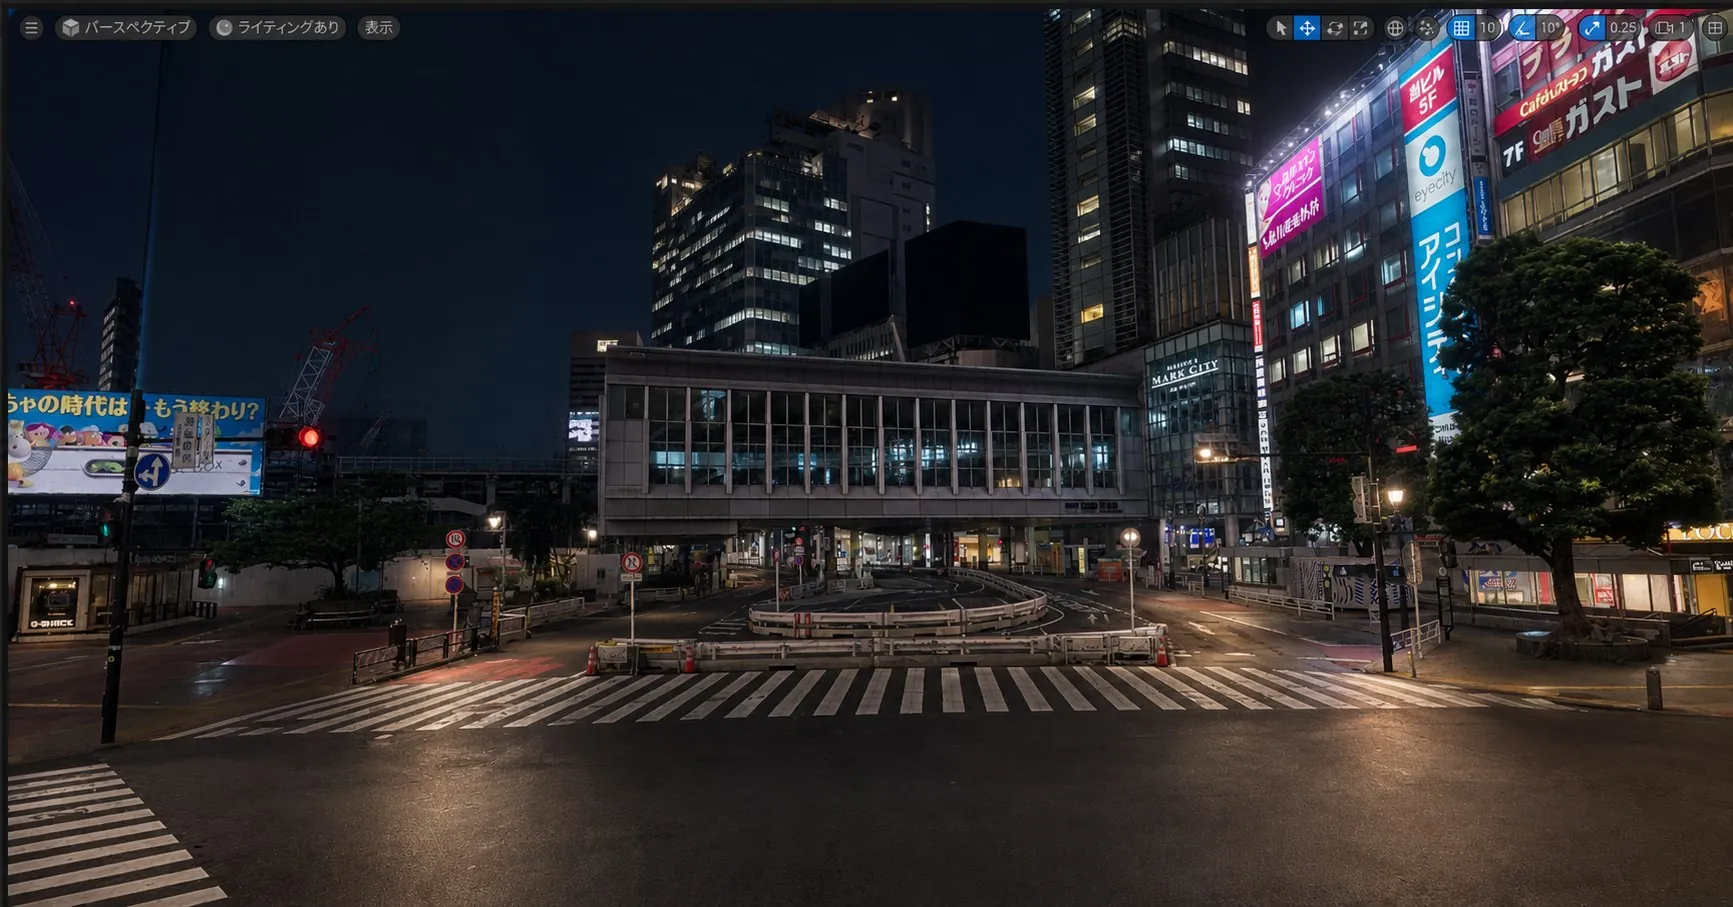
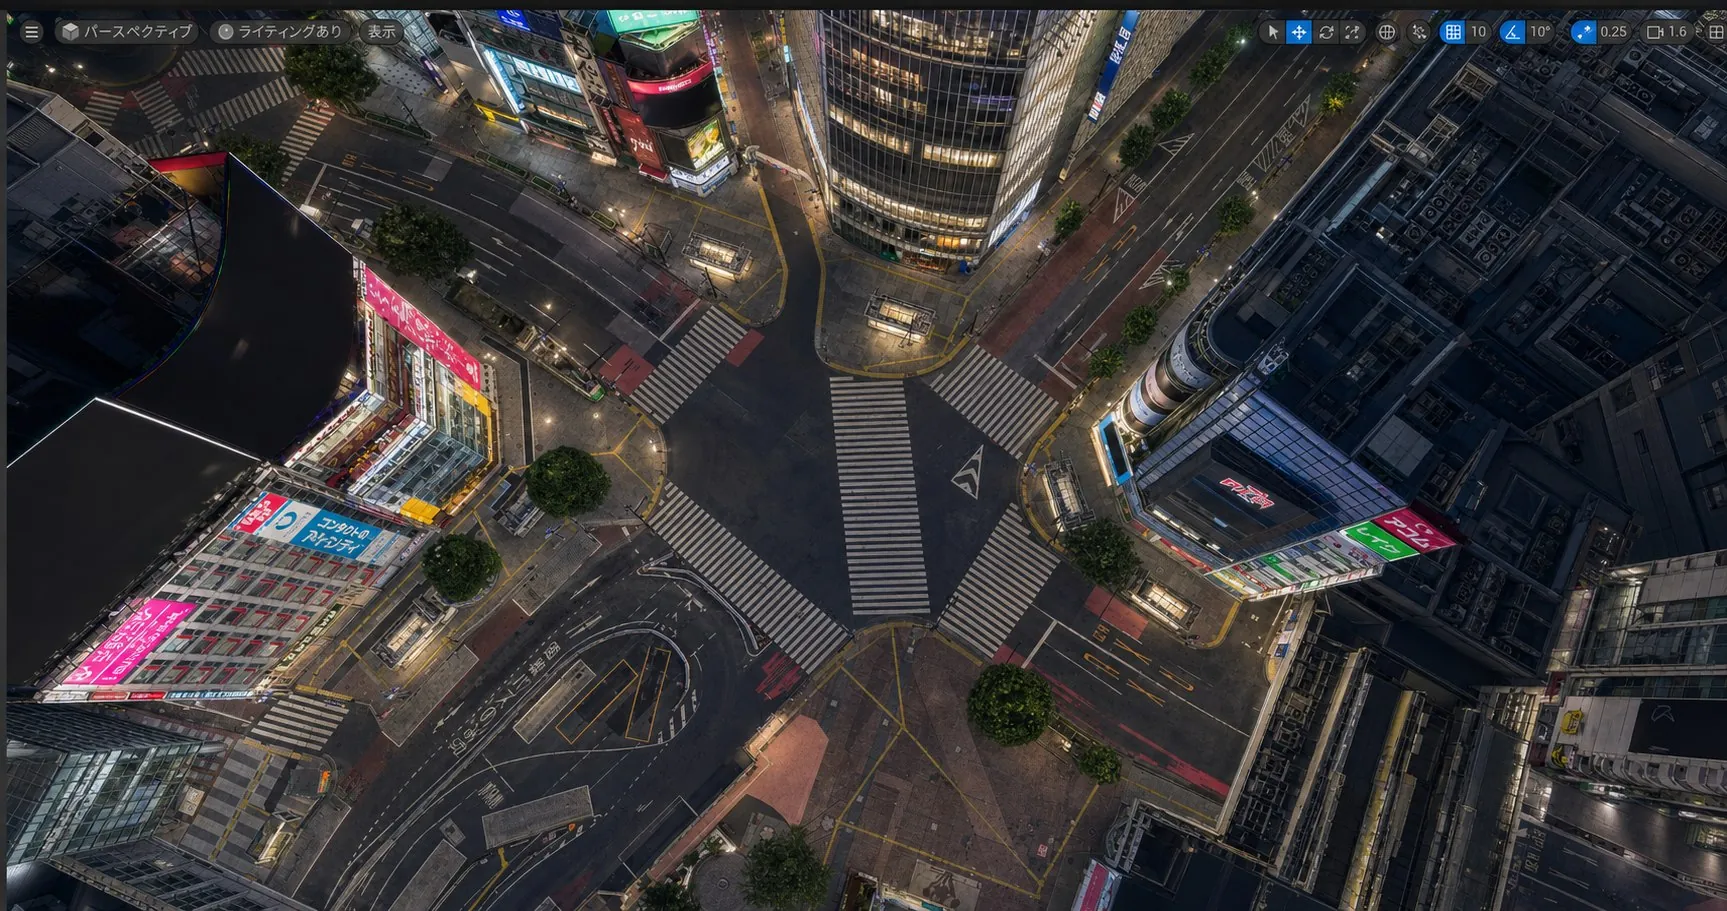
Hand the stills exported from UE5 to an image-generation AI, and swap the lighting and season with nothing more than a short prompt like "make it night" or "make it snow." Since composition, camera angle, and building placement are already fixed on the UE5 side (i.e. by the real scan), the AI only has to handle light and atmosphere. The shorter the prompt, the better the composition holds — this division of labor produces the fewest artifacts.
06 Current limits: signage, text, and man-made detail break down
To be honest about the constraints: signage text and fine man-made structures — trains, road signs — break down under current AI completion. It produces "ghosts" (structures that shouldn't exist) and artifacts like train-shaped geometry generated where no train belongs.
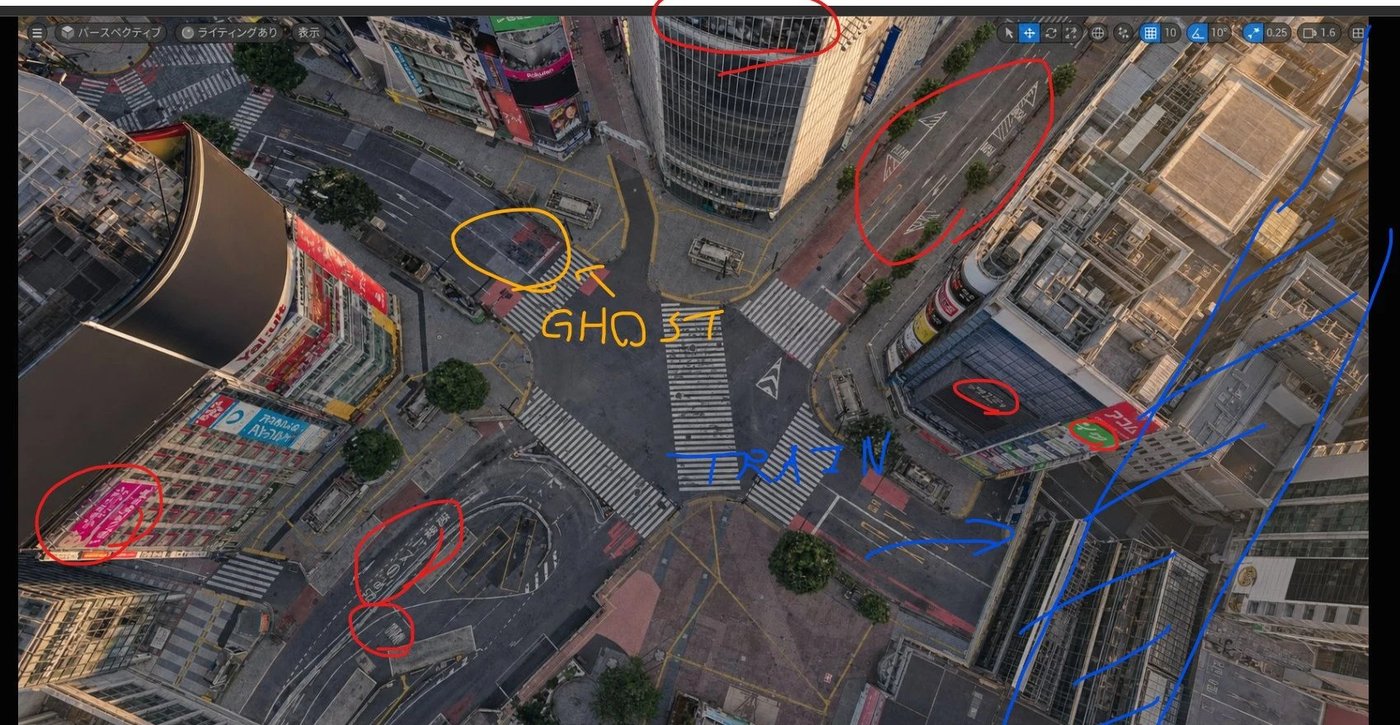
I consider this exactly where professional work lives. By planning reshoots and cleanup passes for the fragile areas in advance, you can bring the result up to deliverable quality. As for the AI completion itself, I expect the accuracy to keep improving.
07 Handling 3DGS in existing DCC software
Game engines aren't the only option — the DCC software already in your VFX pipeline can now handle 3DGS directly. To decide how much to do in a DCC versus in UE5, here's where the major packages stand.
| Software | 3DGS support | Strengths | Weaknesses |
|---|---|---|---|
| Houdini 22 | Native | Treats splats like regular geometry — deform and animate them with standard nodes, and render and relight them directly. Unmatched freedom for procedural splat work | License cost and learning curve are steep. Overkill if you just want to view a scan |
| Blender | Via add-ons | Free add-ons like KIRI Engine's "3DGS Render" cover import, editing, and rendering at zero cost | Add-on dependent, so features and quality vary; heavy with large splat counts |
| 3ds Max | Via V-Ray 7 | V-Ray 7 renders Gaussian Splats directly — slots naturally into existing V-Ray pipelines (archviz and beyond) | Requires a V-Ray license; splat editing is limited |
| Cinema 4D | Via renderers | Renders 3DGS through third-party renderers such as Octane. Pairs well with camera work and motion graphics | Not a native C4D feature — depends on your renderer and its version |
My own split: UE5 for walking through city-scale scenes and hunting angles, the DCC side for per-shot look development and rendering. For aerial-plate work I use a C4D → Octane flow, walked through in detail in Generating an "aerial shot" from 3DGS. For procedural splat work in Houdini, see the Houdini 22 × ComfyUI hybrid workflow article, where hectorVFX demonstrates it on the same Shibuya data.
08 UE5 3DGS plugins that can relight
There are plenty of UE5 plugins that can merely display 3DGS, including free and open-source options. But once you're exporting assets like in this article, the practical dividing line is whether you can change the lighting of an imported splat scene. So here I'm covering only the plugins that support relighting.
| Plugin | Price | Relighting | Strengths | Caveats |
|---|---|---|---|---|
| LCC Plugin for UE (XGRIDs — used in this article) | Free + Pro | Basic relighting in the free tier; relighting with shadows in Pro | Strongest for whole-city scenes, thanks to LCC2 compression. Also reads standard 3DGS files | Pro is free for a limited time; check future pricing |
| Volinga Plugin | Free + Pro | Free tier: simple additive lighting only. Pro: relighting that reproduces shadows and materials | Built for professional virtual production, with deep integration into LED-wall stage equipment | Pro features are paid; the design is optimized for LED-wall VP work |
| Luma AI UE Plugin | Free | Relighting with direct lights such as a sun | Takes Luma captures straight into UE, with free trimming and merging tools | Relighting covers direct light only; engine support is a little dated |
One caveat shared by all three: splats are drawn separately from Unreal's standard rendering, so they don't participate in Lumen global illumination. Relighting in every case works through simplified geometry fitted to the splats, which is what reproduces shadows and light response. Within that field, I've settled on the XGRIDs SDK because it combines relighting support with the LCC2 format design that lets an entire city block live in a single scene.
09 Summary
The whole flow in one line: import the 3DGS scan into UE5 with LCC Plugin for UE, lock the framing with a virtual camera, export stills and video, and let AI swap only the light and season. The essential rule is to never let AI generate everything — always route through the real scan CG. Composition and accuracy are guaranteed by the scan data and the virtual camera; AI only does the finishing. That division of labor is what makes "impossible shots" usable at production quality with minimal artifacts.
If you're interested in UE5 integration or using 3DGS as VFX material, feel free to get in touch.
The Shibuya scramble crossing 3DGS data used in this article is
available on Locahun 3D Online
Provided in PLY / OBJ format with a 3DGS walkthrough. Standard license from ¥200,000 (commercial and non-commercial use). If you'd like to try the same UE5 × AI workflow on the same data, take a look.
View the property data →